1942 - 1947 CHEVROLET SHOP MANUAL
Section 12 - Electrical System
|
|
|||
|
12-22
|
|||
|
|
|||
|
Place one test prod
on the armature and the other on the commutator, Fig. 47. If the test
lamp lights, the armature is grounded and should be replaced. If the
test lamp does not light, the armature is OK.
Armature Test for Short Circuit
|
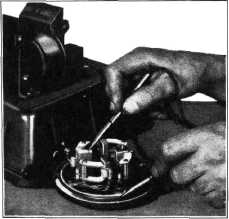
Place one test prod
lead to the cover and the other on the brush holder, Fig. 49. If the
test lamp lights, brush holder is grounded and should be replaced. If
the test lamp does not light, the brush holder is OK.
Brushes
Check the condition of
the brushes and if they are pitted or worn, they should be replaced.
Check the tension of the brush holder springs; they should have enough
tension to hold the brushes snugly against the commutator.
Brush Ground Leads
Disconnect the brush
ground leads from the end frame and clean all terminals and replace.
Check the insulation of the brush to field coil leads. The insulation
should not be broken.
Drive Housing Bushing
Check the condition of
the drive housing bushing. The armature shaft should fit snugly in
this bushing; if it is worn it should be replaced.
REASSEMBLY OF STARTING MOTOR
Thread the shift lever
through the slot in the drive housing, while at the same time engaging
the bosses on the inner end of the lever in the sheave grooves on the
drive mechanism, then slide the lever and the drive into the housing
together, assemble the pivot bolt through the shift lever to the
housing.
Assemble commutator
end washer and commutator end frame assembly to the armature.
Assemble the armature and commutator end frame assembly to the
starting motor housing. Thread the armature shaft through the drive
mechanism, making sure to install the thrust washer between the drive
and the drive housing bushing. Install the through bolts and tighten
them securely.
Assemble the field
coil to brush lead machine screws. Oil commutator end frame bushing.
Connect the starting
motor to a battery and operate for running test. Assemble commutator
cover band and install the starting switch insulators in the switch
and assemble the switch to the motor. Replace starting motor on car
making sure all connections are clean and tight.
THE STARTING SWITCH
The starting switch
is designed to carry the heavy current required by the starting motor
without loss and without heating.
|
||
 |
|||
|
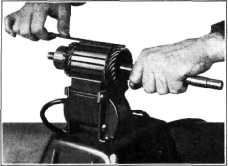
Fig. 48-Armature Test for Short
Place the armature on
the growler, and with a saw blade over the armature core, rotate the
armature and test, Fig. 48. If the saw blade does not vibrate, the
armature is OK. If the saw blade vibrates the armature is
short-circuited and should be replaced.
Commutator
Inspect the commutator
for roughness. If it is rough, turn down on a lathe until it is
thoroughly cleaned up, then sand off the commutator with 00 sand
paper.
Insulated Brush Holder Test for Ground
|
|||
 |
|||
|
Fig. 49-Insulated Brush Holder Test for
Ground
|
|||
|
|
|||