1942 - 1947 CHEVROLET SHOP MANUAL
Section 3 - Front Suspension, Axle & Springs
|
|
|||
|
3-3 |
|||
|
|
|||
|
then lower
the car until the weight is carried on the jack.
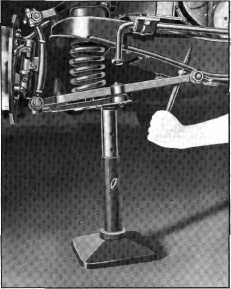
4. Remove cotterpins and nuts from the lower
control arm shaft bracket
bolts. Drive out the bolts and
insert a long drift punch to maintain alignment. Fig. 4.
5. Raise the car slowly with the chain hoist to
remove the spring
pressure. Then remove the stand jack. This allows the lower control
arms and spring seat to drop
down, releasing the spring.
Installation
1. When installing a front spring, make sure
the ground end of the spring is
up and that the lower end coil
of the spring seats in the recess in the lower spring
seat.
2. Raise the lower control arms and spring
seat and place a stand jack
under the inner end. |
LOWER CONTROL ARM PIVOT
PIN
AND BUSHING
Disassembly
1. Raise the car and place a stand jack under
the inner side of the lower
spring seat.
2. Remove the wheel and tire
assembly.
3. Using a 1" socket wrench, remove the lower
pivot pin from the support
arms and knuckle support.
A. Turn the wheel being
worked on to the extreme outward
position. This locks the knuckle support so that it cannot move outward at the
bottom when removing the
bushing.
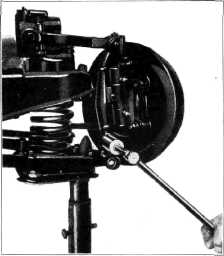
5. Using a
1-1/8" socket wrench, remove the lower pivot pin bushing from the knuckle support,
Fig. 5.
Reassembly
1. Install
the lower pivot bushing and tighten it
firmly in the knuckle support. |
||
|
|
|||
 |
 |
||
|
Fig. 5—Removing Lower Pivot Pin Bushing
Before
starting the lower pivot pin, place a new Neoprene seal around the front lower
control arm and another new
seal over the exposed end
of the lower pivot pin bushing in the knuckle support at the rear, as shown in
Figure 6. This prevents damaging the seals during assembly.
Now start
the new pivot pin into the front lower control arm. Hold the
knuckle support in the center of the
yoke formed by the lower control arms and thread the pivot pin into
the bushing in the knuckle
support, being very careful to
keep it centered in the yoke. |
|||
|
Fig. 4—Maintaining
Alignment between Lower Control Arm Shaft Bracket and
Frame
3. While lowering the car to compress the
spring, use a long drift punch
through the lower control
arm shaft bracket and bolt hole in frame front cross member to maintain
alignment.
4. Bolt the pivot shaft brackets securely to
the cross member and install
cotter pins.
5. Raise the car to remove the stand
jack.
6. Lower the car to the floor and connect the
stabilizer link to the spring
seat. |
|||
|
|
|||