1942 - 1947 CHEVROLET SHOP MANUAL
Section 4 - Rear Axle, Universal Joints & Springs
|
|
|||
|
4-24 |
|||
|
|
|||
|
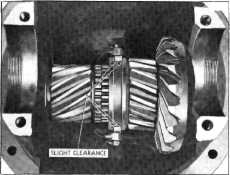
pinion
moves the tooth bearing towards the heel of the tooth, while insufficient backlash
moves the tooth bearing towards
the toe of the tooth.
To check
the backlash use a dial indicator on the heel of a ring gear tooth. Correct
backlash is from .006" to
.012", Fig. 48.
To adjust
the backlash proceed as follows:
If insufficient backlash—remove
the double reduction shaft bearing caps and remove a shim from the left side and add a shim of the same
thickness to the right side.
If the
backlash is excessive—remove a shim from the right side and add a shim of the
same thickness to the left side. Continue these adjustments until the backlash is within
limits. |
 |
||
 |
|||
|
Fig. 50—Axle Shift Lever and Stop Pins
made when disassembling. Tighten
the bearing cap bolts just
"snug."
Check the position of the double
reduction gears with the double reduction pinions. Move the differential by the adjusting nuts until the
double reduction gears line up with the double reduction pinions. Adjust the bearings by pulling the
adjusting nut up tight,
then backing it off one notch.
Tighten the
bearing cap bolts tight and install the adjusting nut locks and then lock all
bolts with tie
wire.
Install the
differential and carrier assembly in the axle housing, using a new gasket between
the housings.
Remove the
pipe plug in the pinion cage and with
a lubricating gun, fill the space between the pinion bearings with one pint of
lubricant.
NOTE—It will not be necessary
for any further lubrication at this point while the truck is in
service.
Assemble
the axle shafts using new aluminum gaskets. Install the capscrew locks and
capscrews, tightening them
securely.
Complete
the reassembly by connecting the rear universal joint. Fill the rear axle housing
with 14 pints of S.A.E. 90
Mineral Oil Lubricant, "All Purpose" or "Universal" gear
lubricant.
Lubrication
Use S.A.E. 90 Mineral Oil
Lubricant, "All Purpose" or
"Universal" Gear Lubricant. However, it is important that the proper viscosity be
selected to match the seasonal
temperatures. While S.A.E. 90
will provide satisfactory year around
lubrica- |
|||
|
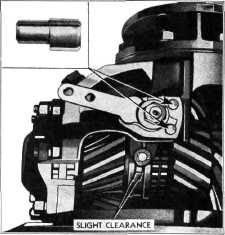
Fig. 49—Shifter Sleeve Yoke Shoe Clearance in
Sleeve
To check
the movement of the shifter sleeve, and yoke shoe clearance in the sleeve, move
the shifter lever to the high-speed position and make sure the side of the sleeve is flush up
against the side of the
high-speed pinion. In this position the sleeve yoke shoes should have a
slight side clearance on
both sides in the sleeve recess, Fig. 49. Move the shifter lever to the low-speed
position and make the same
yoke shoe clearance check with the shifter sleeve flush up against the snap
ring on the low-speed pinion.
Any
necessary adjustments to produce proper shifter sleeve travel or yoke shoe
clearance in the sleeve recess
can be made by turning the shifter lever stop pins, Fig. 50, which are
eccentric, with a large pair of
pliers. A groove in the stop pin indicates the low side of the
eccentric.
Lubricate
the differential bearings, assemble the outer races, and install the assembly in
the carrier. Then assemble the
adjusting nuts and caps, using the capscrews as a guide to line up the
adjusting nuts. Make sure the
cap and adjusting nuts are installed according to the center punch
marks |
|||
|
|
|||