1942 - 1947 CHEVROLET SHOP MANUAL
Section 4 - Rear Axle, Universal Joints & Springs
|
|
|||
|
4-29 |
|||
|
|
|||
|
3. Remove
the nuts from the bolts which attach the support bracket to the cross member.
Then pull the assembly towards
the rear to clear the splines
to the front universal joint.
Disassembly
1. Clamp one side of the universal joint yoke
in a bench vise. Remove the
cotter pin and nut from the
shaft. The yoke may now be tapped off the shaft splines with a soft hammer. Remove the
bearing dust
shield.
2. Wet the inside of the sleeve in the support
bracket with water to soften the soap used when assembling. Place the bracket in a bench
vise, then by moving the
housing from side to side and
at the same time pulling on the housing, it may be removed from the support
bracket.
3. Remove the rubber cushion from the housing
by slipping it off the
machined part of the housing. The universal ball retainer may then
be removed over the rear end of
the housing.
4. With a pair of pliers, compress the tangs
on the end of the bearing
retainer snap ring and remove the snap ring.
5. Using a brass drift and hammer, drive the
propeller shaft and
bearing from the housing.
6. The bearing may now be removed by pressing
it off the shaft in an arbor
press.
Wash all
parts except the bearing thoroughly in clear gasoline or cleaning
solvent.
Examine
the leather oil seal for wear or damage.
NOTE—The seal should not be
removed unless for the purpose of replacement. To remove the seal, drive
it out from the front of the housing, using a piece of shafting. When
installing a new seal, be sure that the free end of the leather is toward
the front end of the housing.
NOTE—The seal should be
thoroughly soaked in light engine oil before assembling.
Inspect
the bushing in the front of the housing for wear. |
A new
bushing may be installed in the same manner as on passenger cars. Check the ball
bearing for roughness by
turning it by hand.
Reassembly
1. Press the bearing on the shaft in an arbor
press.
2. Assemble the shaft and bearing in the
housing. Seat the bearing by
tapping around its outer race, using a soft drift punch and hammer.
Then install the snap
ring.
3. Install a new cork packing in the universal
ball retainer. It is recommended that the packing be shellacked to the retainer. Install the
retainer over the
housing.
4. Install the rubber cushion over the machined
end at the rear of the
housing.
5. Coat the rubber cushion lightly with soft
soap and assemble the support
bracket over the cushion.
6. Install the bearing dust shield and
universal joint front yoke. Tighten the nut and cotter
pin
securely.
Replacement in Truck
1. Place the transmission in gear and then
slide the splines of the front
propeller shaft into the rear
yoke of the front universal joint.
2. Bolt the support bracket to the cross
member.
3. Lubricate the universal ball and then bolt
the universal ball retainer to the rear end of the transmission housing.
4. Raise the rear propeller shaft; remove the
tape from the trunnion
bearings. Seat the bearings in
the front yoke of the universal; install the "U" clamps and tighten the nuts
securely.
5. Lubricate the intermediate universal joint
with S.A.E. 90 transmission
lubricant and lubricate the
front universal by filling the housing with 1 pint of S.A.E. 90 transmission
lubricant. |
||
|
|
|||
 |
|||
|
|
|||
|
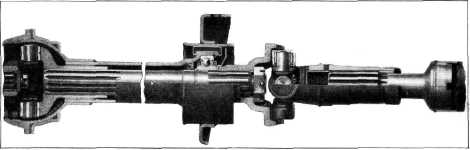
Fig. 59—3/4-Ton and 3/4-Ton Special Truck Front Propeller
Shaft and Support Assembly |
|||
|
|
|||