1942 - 1947 CHEVROLET SHOP MANUAL
Section 6 - Engine
|
|
|||
|
6-52 |
|||
|
|
|||
|
lowing the radiator to fill
between blasts of air. Continue this flushing until the water from the
lead-away hose runs clear. We have now reverse flushed the radiator and
are ready to do the same thing with the cylinder block and cylinder
head.
CAUTION—Apply the air
gradually as a clogged radiator will stand only a limited
pressure.
Attach a lead-away hose to the
water pump inlet and a length of new hose to the water outlet
connection at the top of the engine. Insert the flashing gun in the
new hose as shown in Fig. 105. Turn on the water and when the engine water
jacket is full turn on the air in short blasts. Continue this
sequence until the water from the lead-away hose runs
clear.
If the car has a hot water heater
it should be flushed out separately, Fig. 106, as rust
deposits |
should be replaced. A thermostat
that opens too soon will cause the engine to operate at too low a
temperature; if it opens too late or is sticking, the engine may
overheat. |
||
 |
|||
 |
|||
|
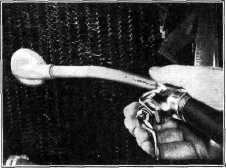
Fig. 107—Blowing Out Radiator Core
The following opening thermostats
should be used for the cooling solutions indicated.
Regular ................... 140°
Alcohol or similar
non-permanent
Anti-Freeze—Not over ....... 148°
Permanent Anti-Freeze
......... 166°
After checking, reassemble the
thermostat and water outlet connection, using a new gasket. Examine
all hoses both inside and outside. If the inside is soft and rotten,
replace the hose, otherwise loose particles of rubber may be carried into
the radiator and block the water passages. Adjust the fan belt to the
correct tension.
Close the cooling system drain
cocks and fill the cooling system with water. Tighten the hose connections
and check all points for leaks.
Check the water pump for leaks. A
leaking water pump, when the engine is not running, will draw air into the
system when the engine is running. This excess oxygen in the cooling
system may accelerate the formation of rust as much as 900 per
cent.
Examine the radiator for leaks and
tighten the radiator mounting bolts.
After completing the
reconditioning, warm up the engine by allowing it to run for 20 minutes at
a fast idle (approximately 600
R.P.M.) then tighten all cylinder head bolts. It is advisable to
use a tension wrench so the tension on each bolt will be equal. A tension
of 75 to 80 foot pounds is recommended.
After tightening the cylinder
head bolts the valve clearance should be adjusted in the following
manner: |
|||
|
Fig. 106-Flushing Heater
will build up in the heater core
just as they do in the radiator. This condition will obviously reduce the
efficiency of the heater. If the flushing is done in the spring and the
heater will not be used until fall, it is wise to discard the hose. If the
flushing is being done in the fall, replace the hose.
Dirt and bugs may be cleaned out
of the radiator air passages by applying the radiator core cleaner gun to
the back of the core, Fig. 107.
Conditioning the Cooling System
After cleaning and reverse
flushing, it is necessary to condition the cooling system to prevent
leaks, retard the formation of rust and make sure that the engine will be
properly cooled.
The thermostat plays a very
important part in the cooling system and before reassembly it should be
checked as outlined under "Adding Anti-Freeze." item No. 6, to see that it
is functioning properly.
If the thermostat is opening at
too low a temperature, too high a temperature or is sticking,
it |
|||
|
|
|||