1942 - 1947 CHEVROLET SHOP MANUAL
Section 6 - Engine
|
|
|||
|
6-54 |
|||
|
|
|||
|
Care
The dry
disc type clutch requires very little care during its life. Only one simple
adjustment is necessary to
maintain clutch efficiency and assure long life. This adjustment is for the
amount of free clutch pedal
travel before the throwout bearing contacts the clutch
fingers.
The ball
bearing throwout bearing, in conjunction with the clutch spring makes a simple
construction and results
in little friction and wear in the mechanism. The ball bearing is the
sealed and permanently lubricated type packed with a high melting point lubricant which makes further
lubrication unnecessary,
except for packing the inner and outer grooves of the throwout
bearing collar when assembling. Fig.
118.
Checks to be Made Before Overhauling
Clutch
There are
quite a number of things that will affect clutch operation besides the clutch.
For this reason there are
certain preliminary inspections that must be made to determine whether or
not the trouble is actually in
the clutch. These inspections are as follows:
1. Check the clutch pedal adjustment and make
sure the pedal has from 3/4
to one inch free travel
before the clutch starts to disengage.
2. Check the clutch pedal bushing for wear and
for sticking on the shaft or
striking the floor board.
3. Lubricate the pedal
linkage.
4. Tighten all front engine mounting bolts.
Should the mountings be oil
soaked it will be necessary to
replace them.
5. Tighten all rear engine mounting bolts (at
the rear of the transmission). Make sure mounting studs are tight in
transmission
case.
6. Check clearance between the
transmission cross member
and the "U" section plate.
This clearance should be from .005" to .015", equally spaced fore and
aft. If the clearance exceeds
these limits, remove the
mounting and bend the "U"
section plate until the clearance is within the above
limits.
NOTE—This clearance is very
important, because it limits the fore and aft movement of the
engine.
7. Tighten all side engine mounting
bolts.
8. Remove the bolts from the engine side
mountings and check the
clearance between the
mounting and its bracket on each side, if the clearance is more
than |
1/16" shim
with 3/8" plain flat washer. If the clearance is less than 1/16", loosen the bracket bolts and push the mounting upward. (There
may be sufficient clearance in
the bracket bolt holes to give the necessary 1/16"
clearance.) If unable to get the
proper clearance in the manner mentioned above, remove the
brackets and elongate the holes with
a round file until 1/16" clearance between the mounting and
bracket is reached.
NOTE—It is important that these
mountings be set up with an equal amount of tension on each
side.
REPAIR OPERATIONS
To remove
the clutch from the flywheel, it is first necessary to remove the transmission
from
the chassis.
Refer to
the Transmission Section for a detailed explanation of this
operation.
1. Remove the clutch throwout bearing from the
fork.
2. Remove the clutch fork by pressing it away
from its mounting with a
screwdriver until the fork
snaps loose from the ball.
The spring
retainer may be removed from the groove in the fork by prying one end out at
a time with a small
screwdriver.
3. Remove the throwout fork mounting from the
clutch housing with a 3/4"
wrench.
4. Install the clutch pilot tool, K-411, to
support the clutch during disassembly. Loosen the six
 |
||
|
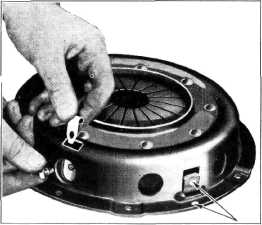
Fig.
112—Removing or Replacing Pressure Plate Refracting
Springs |
|||
|
|
|||