1942 - 1947 CHEVROLET SHOP MANUAL
Section 6 - Engine
|
|
|||
|
6-55 |
|||
|
|
|||
|
clutch
attaching bolts one turn at a time (to prevent cover distortion) until the
diaphragm spring pressure is
released.
5. Remove
the three clutch pressure plate retracting springs, then remove the pressure
plate from the clutch cover assembly, Fig. 112. Note the position of the "O" marks on the
pressure plate and cover.
These must be matched when reassembling in order to maintain proper
balance.
NOTE—For ease of servicing,
the clutch cover, diaphragm spring and two pivot rings are built up as an
assembly. If inspection shows that there is a defect in any of these parts
it will be necessary to replace the complete cover
assembly.
Inspection
The first
step in connection with inspection of the clutch is to wash all parts
(except the throwout bearing and
disc) in clean gasoline or cleaning solvent.
CAUTION—The clutch throwout
bearing is permanently packed with lubricant and should not be soaked
in gasoline, as this may dissolve the lubricant from around the bearing
balls.
1. Inspect the pressure plate and flywheel for
any indication of scores on the
contact surface. Then check
the three pressure plate drive lugs for burrs. Make sure that these lugs move
freely in the three slots in
the cover. Check the clearance between the lugs and the cover; this
clearance should be from .002"
to .008".
2. Check the throwout bearing for roughness
and free fit on the sleeve of
the transmission clutch gear bearing retainer.
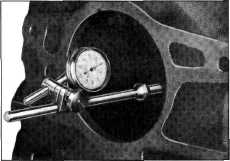
3. Check the run-out of the transmission pilot
hole in the clutch housing. Fig. 113. This should be within .008" indicator
reading. |
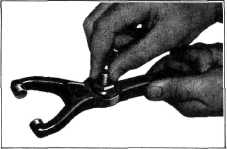
4. Check
fit of the ball in the throwout fork; this should be snug without
end-play, Fig. 114. |
||
 |
|||
|
Fig. 114—Checking Free Fit of Fork Ball in Clutch
Fork
5. Inspect
the clutch disc for worn, loose or oil soaked facings, broken springs, rivets loose
in hub or "riding." Examine
the splines and check to see
that they move freely on the splines of the transmission clutch gear. If the
splines are worn, the clutch disc should be replaced.
To assure a
job that will perform smoothly and effectively for many thousands of miles,
all of the foregoing
inspections and adjustments must be made.
Clutch Disc
Two
diameter clutch discs are used in production and service. The first
or the 9-1/8" disc is used on
passenger cars and 1/2-ton trucks. The second or l0-1/4" disc is used on all 3/4
and 1-1/2-ton trucks. |
|||
|
Pilot Bearing
The clutch
pilot bearing is a cage roller type Hyatt bearing. This bearing requires
attention only when the clutch
is removed from the car, at which time it should be removed, cleaned,
inspected, and replaced if
necessary.
To remove
the bearing from the end of the crankshaft it is first necessary to remove
the bearing retainer.
Special puller, K-445, is required to remove the retainer without damaging the
roller
bearing.
This
puller is designed with a small diameter which centers into the clutch pilot bearing.
A large aligning bushing on the
puller can be moved forward and centered in the transmission pilot
hole in the clutch housing so
the retainer will be pulled straight out, and there will be no
possibility of the lip of the
retainer digging into the bore in the crankshaft. When installing this tool, the
tool head should be threaded
into the retainer two full turns and, with the clamp in position as
shown in |
|||
 |
|||
|
Fig. 113-Checking Run-Out of Transmission Pilot
Hole |
|||
|
|
|||